I have to share the most exciting bit of knowledge I came across last month. It took me a while to get the hang of it, but I am TOO excited now with my new set of skills.
I have long enjoyed looking at the new digital tools out there, being a semi computer nerd myself, and I always coveted the lovely digi products that have popped up around the web. I have become pretty good at taking photos, then futzing with them using Picasa. I learned how to print out digital elements using MS Word, and I long dreamed of buying Photoshop, so I could use all the fun masks, brushes and etc. that I saw other scrappers use. I live by the blogs of Ali Edwards and Cathy Zielske. However, Photoshop always seemed like a luxury purchase. Sure, it would be fun to have a new tool to make the coolest projects with, but with an average price of $60 and up, it was, well....an expensive (to me) impulse purchase.
So, I put on my thinking cap and tried to figure out how to add bits and pieces to my photos, with no luck. Then, finally, this show:

While listening to the second episode, I got all excited and decided I HAD to learn how to go (just a little) digi. So, I left a comment on the message board, and would you believe it-someone responded, just to me! They gave me SUPER simple instructions on how to manipulate digi products in MS Word. (For those of you who are not familiar, digi scrapbook products come in PNG and JPG formats and I could not figure out how to layer them on top of a photo I had taken). I was SO tickled and have spent the next few weeks trying it out, and I think I finally have the hang of it!
On to the challenge: my first (almost digi) layout! I hope I can share what I learned with you, my bloggy friends. I hope I can explain it to you, step by step, in a clear way. If you have any questions, leave me a comment, and I will ty to clarify with my limited knowledge. I included screen shots of my process, click on them to see them larger.
1. Open your photo in Word, resize to the size you want to print. Then go to Text Wrapping and choose an option, here I chose Behind the Text.

2. Open the digi element in the same document. I used the Summer Kit from Shimelle Laine. It will be large and either beneath or under your photo. Go to Text Wrapping>In Front of Text, then you can use the little boxes in the corner to make it approxiamtely the same size as your photo.

3. Then-The Magic. Holding down the left-click button of your mouse, drag the frame over your photo. You should be able to see 'thru' the frmae onto your photo, and put it in the proper position. Voila! ACCKKK! That noise you hear was the squealing that happened the first time I got that to work. SO EXCITED!
4. Once you have the frame over the photo the way you like, you can print it out as is, or you can be super crafty and add a few more bits and pieces over the top. Shall we?
5. Open yet another graphic, like a butterfly. I decided I wanted it to be a pretty coral color instead of yellow, so I recolored it. In Word 2007 there is a format toolbar at the top of the screen. You can use the Recolor Feature by choosing: Recolor>More Variations>More Colors.
Like this:

6. Now that you have the PERFECT color of butterfly, resize it and do the whole 'On Top of Text' Action. You can also use the small square that appears above the box around the butterfly to change the tilt. That's how I got one butterfly to tilt one way and the other to tilt the opposite direction.
7. Sit back and pat yourself on the back. Done? OK, this is how my photo looked when it was all jazzed up:

Now, you can print her out.
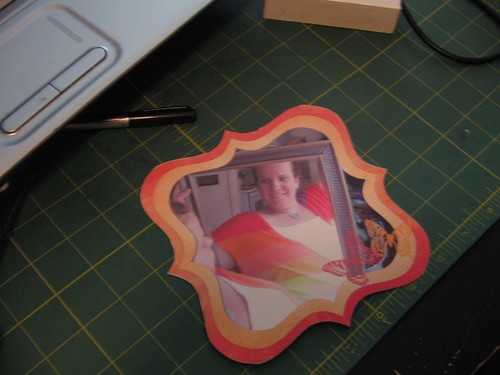
ACCKK! Sorry, I was just admiring my awesome skills. lol. This is how she looks printed on my home printer. You may have noticed on the screen shot that you could see little corners of the photo peeking out from the frame, but when I cut it out, I just trimmed them off.
Now, the rest of the layout:
1. I wanted to use some of the awesome patterned papers in this kit on my layout, so I used the same technique to layer them in a Word document. One difference-I used the 'Crop' button in the Format menu to crop out part of the paper and keep a two inch strip. I used this paper from another kit.
2. I decided to get EXTRA crafty and add a brush to one of the paper strips. (A brush is like a digital stamp, words you can add over a photo or paper.) I used this freebie from Ali Edwards
3. I made a title for my layout using an alphabet from Shimelle's kit. I added each letter one at a time, used the Text Wrapping, resized, then moved each letter together so they slightly overlapped.
All printed out on white cardstock:
Three things to notice: the 'Capture the Moments' stamp over the paper. So pretty. I ran out of room on my 12 x 12 layout, so I had to chop off the stamping the final project-very sad. Also, some of the digi papers have a cool texture that make them look dimensional. Very cool!
4. I printed out a set of freebie tags I found here. The other cool thing about digi scrapping is there are tons of freebies out there. I will link to a few at the bottom of the post. I just printed them out as is on white paper.
gettingdigi3 src="http://farm5.static.flickr.com/4142/4891459484_a311f589b0.jpg" width=500>
A lot of work printing, now to put it all together! I had my other pictures, I assembled it all, I used a little machine stitching to add some dimension. I also pop dotted the large photo to make it stand out a little. Brads, number stickers, journalling.......
Drumroll, please!!!!
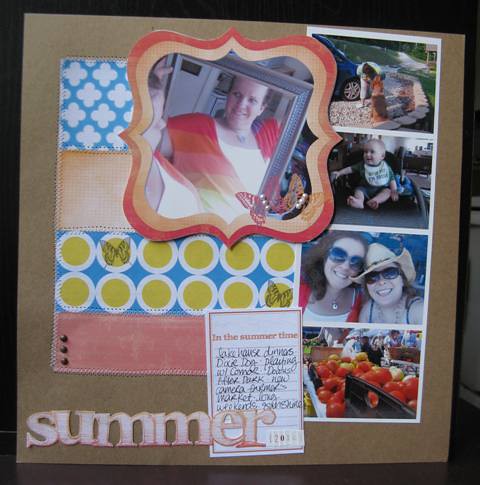
Isn't it pretty! I love love LOVE the way it turned out! It took a lot longer than a purely paper layout would have taken, but it was really fun learning this new techniques and expanding my craftiness. I am really looking forward to doing this again.
A few notes and tidbits:
* This process was slower, some because my Word program ran a little slow. Sometimes I would resize one of the digi images and it would take a second or two for the computer to 'catch up'. That freaked me out at first, but once I figured out it would be OK, I just clicked and waited.
* There are digi elements out there called masks, that crop photos into fun shapes and add a frame. So far, I have not been able to make them work. The inside of hte frame is black, and I couldn't get the shape to go around the photo.
* Think outside the box for creative ways to use the digi elements. You could recolor them, print them out on vellum, transparency or on patterned paper. There are TONS of different looks you can get!
* There is a great series of posts about basic digi skills here by Ali Edwards. She doesn't cover how to layer digi elements in Words, but she does explain a lot of basics.
Products I used:
Capturing Moments (sorry, can't find the link. It's a freebie, so I will keep looking!
Shimelle's Summer Kit
Creativity Prompt Journal Blocks (she has LOTS of free printables on her site!)
Whew....long post! Thanks for sticking with me! Have you tried this technique? Any tips or pointers? Put them below, I would LOVE to hear them!
Off to watch last night's mad Men!
Later, M.